
April 26, 2026
May 31, 2020

Djongo & NoSQL
Django + MongoDB = Djongo - enjoyable work with NoSQL database
Relational and non-relational base
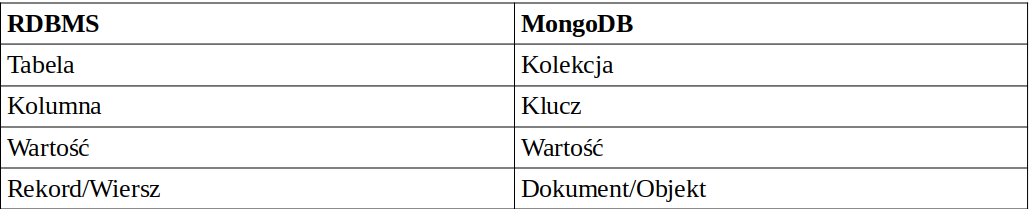
In non-relational databases, as the name suggests, there are no relationships. In SQL, they are used to avoid duplication of data in many places. The data itself is not stored in tables but collections similar to them. The table below may help you understand the concept more easily.
Queries in a relational database are created using SQL, while in NoSQL databases, we can use scripting languages such as JavaScript, Ruby, or Python. Its horizontal scalability is particularly appreciated, which allows you to work with Big Data. When it comes to the performance comparison between SQL and NoSQL, the table below presents the test results carried out by ArangoDB.com, which shows the strengths and weaknesses of non-relational databases.
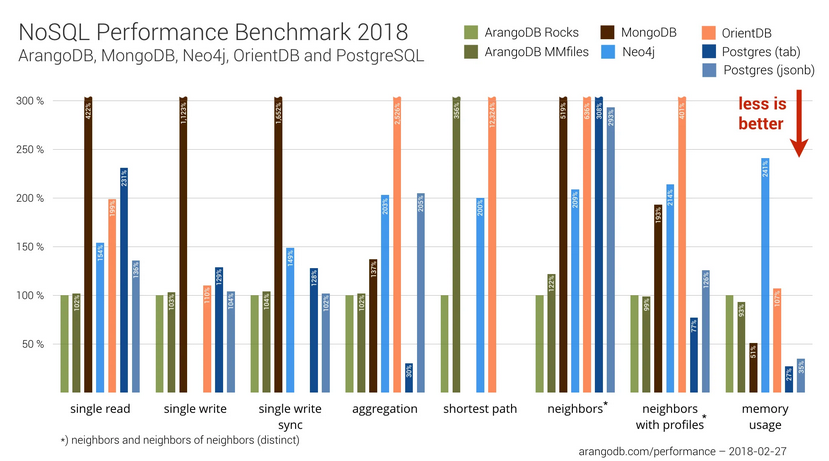
In simple queries, NoSQL databases can be slightly faster but generally represent a similar level. For those used to working with relational databases in Django, there is a package that makes it easier to switch to non-relational databases. Djongo is a package that allows you to easily connect to the MongoDB database and use it as a SQL database. It currently requires Python 3.6 or higher and MongoDB 3.4 or higher if you want a local database downloaded from this site. I will show how to connect a base located in the cloud.
Create a free account on
    - We go to the site MongoDB.com
    - We fill out the registration form
    - After logging in, press the Build a Cluster button
    - We chose the Free option
    - We choose the base supplier, region and name Cluster
    - Go to the Database Access tab and create the user and password for the database
    - Go back to the Clusters panel, press the connect button and add your IP address
    - Then select Connect your application
    - After selecting the Python language, a Connection String is generated and we copy it
Djongo Configuration
Now we continue to the code. I assume you have Django installed and a new project created. Now we can install Djongo with the command:
pip install djongo
Go to settings.py and look for Databases. In ENGINE, we enter djongo. NAME is the name of the base. PORT should be entered 27017. In the HOST place, paste the previously copied Connection String and complete the user and password. Finally, this is how our setting should look like:
DATABASES = {
        'default': {
            'ENGINE': 'djongo',
            'NAME': 'base_name',
            'PORT': 27017,
            'HOST': "mongodb+srv://'user_name':'base_password'@cluster0-ezmy4.mongodb.net/test?retryWrites=true&w=majority",
            'USER': 'user_name',
            'PASSWORD': 'base_password',
We have configured the base. Now we can migrate. To do this, perform:
python manage.py makemigrations
And:
python manage.py migrate
If we go back to our base, we will notice that many collections have appeared in our cluster.
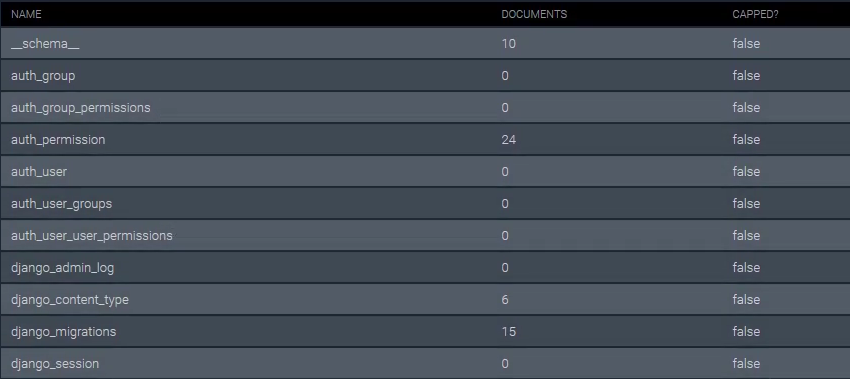
They are still empty at the moment. Let's create a new user using the command:
python manage.py createsuperuser
We received a notification about success. Now our auth_user collection contains a document with information about the user we created. For more information, please visit the djongo website.

